My Everyday Homestead Kitchen Setup
Disclosure: As an Amazon Associate, I earn commissions from qualifying purchases. If you choose to purchase through the links on this page, it helps support Going Homesteadily and our family at no additional cost to you. I only share products I personally use and truly find helpful in our home.
Managing Daily Baking
I bake almost every day and I cook almost every meal from home… And I film a lot of it.
This is the equipment that makes that possible in a smaller, real-life kitchen.
I want to assure you, you do not need a dream kitchen. I had one once, but we had to move! haha So here we are, and I can assure you that all you need are tools that work. AND, you don’t need to get them all or all at once!
Everything below is something I personally use in our home and think is worth recommending. I truly appreciate choosing to make your purchases though my links for any products you need!
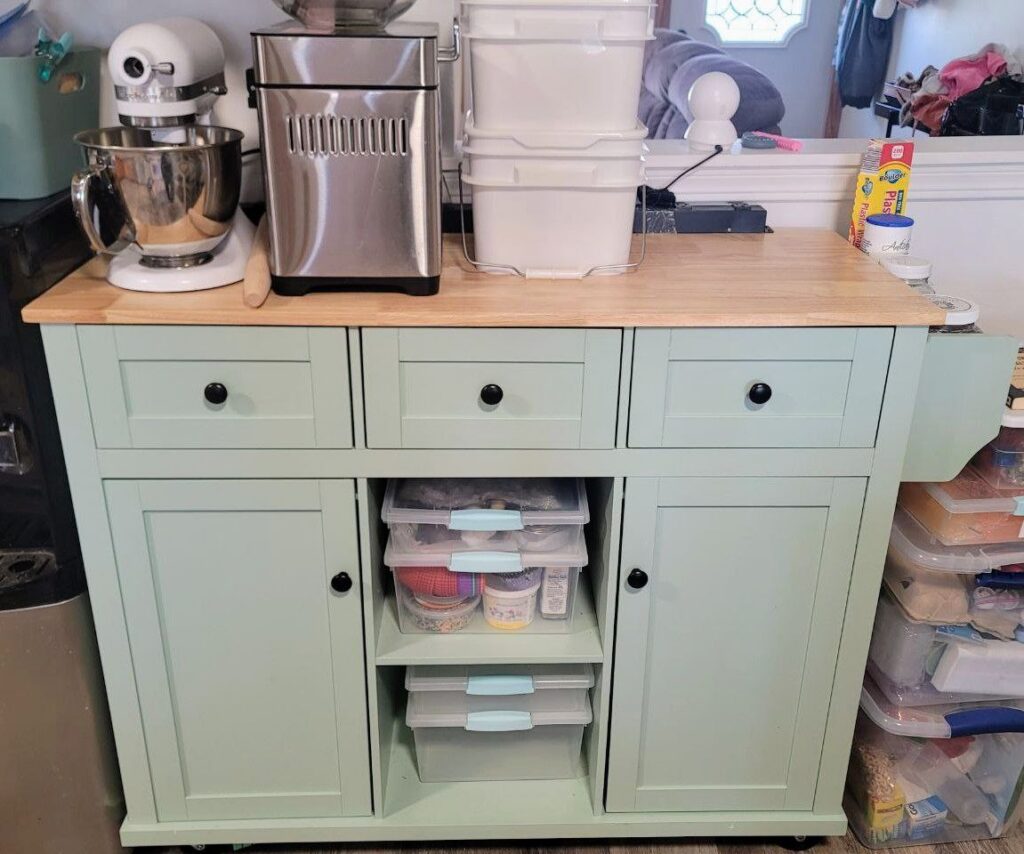
Rolling Kitchen Cart
This is the heart of my setup. It gives me drawer storage, a drop leaf workspace, and cabinet storage, all on wheels. Because it is not full cabinet depth, it tucks easily into our eat-in kitchen space and doubles as a small island. [Shop the cart here] You can also learn more about the cart in this blog post.
Mixing Equipment
Artisan Stand Mixer
I think a mixer is essential for any homemaker, and it is useful for a wide variety of home functions. We choose the Artisan 3.5 quart KitchenAid because it was far more affordable (though it has gone up a lot in price). Plus its compact enough for a smaller kitchen but strong enough for regular baking.
I use mine constantly, especially with the slicer and shredder attachment and the grain mill and meat attachments. Its great for mixing, sure, but also for whipping – like homemade whipped cinnamon honey butter, whipped topping, and even tallow balms. [Shop the stand mixer]
KitchenAid Attachments
This KitchenAid attachment gets used almost daily for cheese and produce. It saves a ton of time and earns its space. We fresh shred cheese for all our cheese sauces, pizzas, and lasagna bakes (they just melt so much better!), and I can get all I need for my recipe in under 2 minutes including prep and clean up. [Shop the slicer/shredder attachment]
KBS Bread Machine (Used for Dough Only)
I love this machine for mixing sandwich-style dough and yeast breads that benefit from warm mixing. I do not bake bread in it, though, because it makes some pretty dense loaves with a weird bum hole where the mixer paddle is LOL. I use it for mixing and heated fermentation because I can just throw the dough in and ignore it while the machine does all the hard work at just the right temperature. This one goes on sale often, and I got my second one off MarketPlace. I’ve even seen this one at a thrift shop once! [Shop the bread machine]
Flour & Sugar Storage
2 Gallon Food Grade Buckets
When you’re baking a lot, its great to have a wide container that keeps your flour dry and bug free. Each bucket fits a full 10 pound bag of flour. The lids seal tightly and can be used with oxygen absorbers for longer term dry food storage. With how often I bake, mine are opened daily for all purpose and bread flour, so I love that that the long-term seal tabs can be removed for regular use. [Shop the buckets]
Airtight Sugar & Specialty Flour Containers
When you bake a lot, its not just bulk flour you want to keep sealed and dry (and away from critters!). I use clear airtight containers for brown sugar, powdered sugar, and smaller bags of specialty flours. Keeping them visible makes baking faster and more organized. [Shop tall flour containers] [Shop Rubbermaid assorted size containers]
Bread Tools & Accessories
Bannetons (Proofing Baskets)
I keep multiple sizes and shapes of bannetons. They store easily inside my baking cart cabinets and hold up well with regular baking. You can use silicone bannetons, but I have never had issues with my rattan baskets. I just remove the liners, dust them off and let them fully dry before storing them in a bag in the freezer, and I let the baskets fully dry out before storing them in my baking cart.
The round (boule) banneton set I have comes with a lame, extra blades, and 2 bench scraper types. [Round banneton and proofing set]
The oval banneton set I have comes with a multiple accessories, too. And, the oval (batard) Dutch oven I recommend under the Pans and Containers section comes with a banneton as well. [Oval banneton proofing set]
If you want to make sourdough soup bread bowls or mini loaves, I have had success with this set! [Bread bowl set]
Flour Duster
This is a tool I didn’t realize how much I “needed” until I saw a video of a gal using them to dust her shaping surface. I thought it was brilliant! Finally, a way to very lightly dust my counter without big globs of flour everywhere. [Shop flour and sugar shaker]
Bench Scraper
I have multiple scrapers that came with my banneton sets, and I use all of them without preference. However, this KitchenAid flexible bowl scraper set is worth the extra purchase since it can curve to scrape bowls as well. [Shop bench scraper]
Bread Lame
I don’t even have a recommendation here. My Dutch oven and banneton kits came with a lame, and they work great since I’m not doing complex designs.
Pans and Containers
USA Pan Loaf Pans
Made in the USA and extremely durable, these are the only bread pans I use for my typical sandwich style loaves. I use various sizes, whether I want a 1-pound loaf (most popular to get through in a few days before it molds), a 2-pound pullman loaf with lid (great for large families and that flat-top bread), or a 1.5-pound wider loaf, like the sourdough sandwich breads you find at the grocery store. [Shop 1-pound loaf pans] [Shop 1.5-pound loaf pan] [Shop 2-pound pullman loaf pan]
Cambro Container
When you are waiting for your dough to rise 50% or 100%, its helpful to have a visual guide for rise. I typically use these 4 quart containers comfortably for 2-3 loaf doughs. [Shop 4q Cambro containers]
Dutch Ovens
If you are going to bake sourdough, having the right sized Dutch oven makes a noticeable difference in crust and oven spring. The enclosed space traps steam during the first stage of baking, which is what creates that beautiful rise and crackly crust. I went through a few different sizes before finding what worked best for my recipes.
Whether you prefer to bake round loaves (boules) or oval loaves (batards), there are great options for both shapes. My 4.5 quart round Dutch oven has been perfect for my 500g country sourdough loaves. For oval loaves, I recently added an oval Dutch oven to my setup, and it has worked beautifully for batards. The one I chose also came as a kit with a banneton, lame, Danish dough whisk, and other helpful tools, which makes it a great starter option if you are building your sourdough setup.[Shop 4.5q Round Dutch Oven] [Shop 5q Oval Dutch Oven]
Measuring
Digital Kitchen Scale
I do not use a specialty high-end baking scale for the scope of my current baking level. This simple, budget friendly digital scale works perfectly for daily starter feeds and 500 to 1000 gram recipes. I love that it is rechargeable AND uses batteries, because I never remember to charge it. [Shop kitchen scale]
You Do Not Need Everything at Once
If you are just starting, begin with:
- A basic scale that measures in grams
- A loaf pan or 2
- A flour storage system
- Mixing bowls – my favorite are vintage PYREX from a thrift store
Build slowly.
Most of what you see here was added one piece at a time over 4 years as our baking became more consistent. And, there are things I got early on that have gone unused and been donated. Rest assured, you won’t see me recommending them!
This is not about having the best kitchen.
It is about building skills in the kitchen you have.